For Part 10 of the Data Center in a Bag project, I finally put the external 1 TB drive to work.
Up to this point, most of the project had focused on networking, virtualization, routing, security testing, and portable services.
But there was still an obvious gap:
What happens if I need to recover one of these systems?
The answer was to add dedicated external storage and turn it into a Proxmox backup target.
Preparing the External Drive
The drive was previously formatted for macOS, so the first step was identifying it carefully before making any changes.
The Proxmox host showed two 1 TB disks:
sda  931.5G  Internal Proxmox disk
sdb  931.5G  External 1 TB drive
The important part here was making absolutely sure I was working with the external disk.
After confirming /dev/sdb was the correct device, I removed the previous filesystem metadata and created a new GPT partition table.
The drive was then formatted as ext4:
mkfs.ext4 -L travel-storage /dev/sdb1I created a dedicated mount point:
mkdir -p /mnt/travel-storageand mounted the drive there:
mount /dev/sdb1 /mnt/travel-storageThe result was roughly 916 GB of usable storage.
Making the Mount Persistent
A manually mounted disk is not very useful if it disappears after a reboot.
I retrieved the filesystem UUID:
blkid /dev/sdb1and added the drive to /etc/fstab using the UUID instead of the device name.
The mount entry looks like:
UUID=1ff2c691-e0a7-41e0-a8cb-0f3b2b6bd7d6 /mnt/travel-storage ext4 defaults,nofail 0 2I used nofail because this is an external USB drive.
If I ever boot the travel server without the drive attached, I do not want the missing disk to interfere with startup.
After reloading systemd and testing the mount, the drive came back successfully at:
/mnt/travel-storageAdding the Drive to Proxmox
Next, I added the mount into Proxmox as a Directory storage target.
The storage was named:
travel-storageand configured to hold:
- Backup files
- ISO images
- Container templates
I intentionally did not use the external drive for live VM or container disks.
The internal Proxmox storage still handles the running workloads.
The external drive is there for recovery and portable storage.
Testing a Real Backup
Simply adding a backup destination was not enough.
I wanted to prove that Proxmox could actually write a usable backup to it.
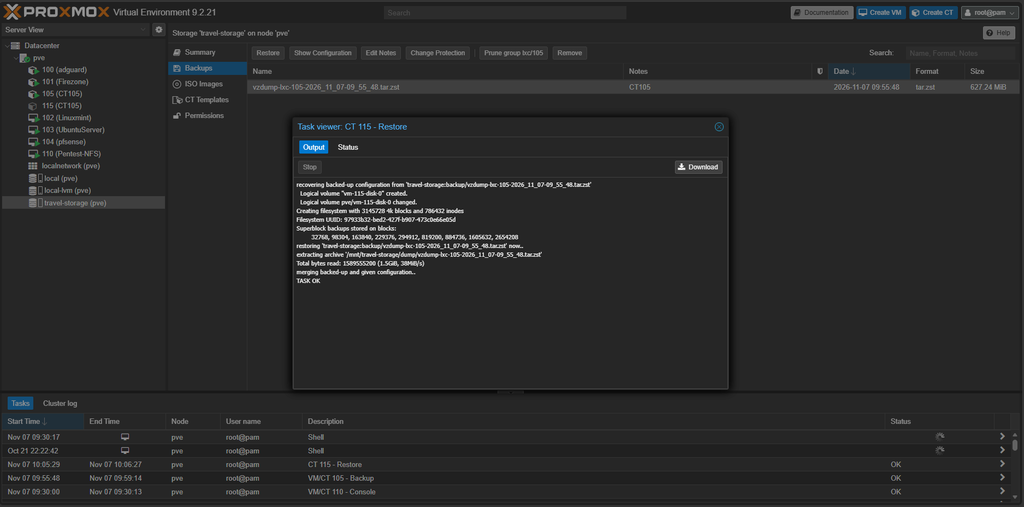
I selected CT105, one of the containers in the isolated pentest lab, and performed a manual snapshot backup using the new travel-storage target.
The backup completed successfully and created a VZDump archive under:
/mnt/travel-storage/dump/Proxmox returned:
TASK OKAt that point I knew the external drive could successfully receive backups.
But a backup is only useful if it can be restored.
Testing the Restore
The next step was restoring the CT105 backup as a completely separate container.
Instead of overwriting the original CT105, I restored the backup as:
CT115The restored system was placed back on the normal internal Proxmox storage.
The restore completed successfully:
TASK OKThe container booted normally and the recovered filesystem and configuration were intact.
Avoiding an IP Conflict
Because this was a side-by-side restore test, the original CT105 was still running.
The restored container inherited the original address:
172.22.50.20/24That would create an IP conflict if both containers were started at the same time.
For the test, I changed the restored container to:
172.22.50.21/24The isolated pentest lab does not use a default gateway for this system, so the restored container remained isolated.
From Kali, I tested connectivity:
ping -c 4 172.22.50.21The restored container responded successfully with zero packet loss.
That was enough to prove the recovery path worked.
An Interesting Recovery Detail
The restored system also preserved the Docker configuration from the original environment.
The Juice Shop container was still configured to bind to:
172.22.50.20:3000Since the temporary restore had been changed to .21, the application did not immediately start on the new address.
In a real disaster recovery scenario, however, the original system would normally be unavailable and the restored system would likely keep the original IP.
So the preserved configuration was actually what I would expect from a faithful recovery.
The only reason the application binding became an issue was because this was a side-by-side test environment.
What Part 10 Added
The Data Center in a Bag now has:
- 1 TB of dedicated external storage
- persistent ext4 storage mounted on the Proxmox host
- a dedicated Proxmox backup target
- support for backups, ISOs, and container templates
- a successful VZDump backup
- a successful container restore
- a validated recovery workflow
- proof that the restored system boots and is reachable
This was an important addition to the project.
The travel kit is no longer just capable of running services.
It can now recover them too.
For a portable environment that includes pfSense, Linux systems, Docker workloads, security tools, and an isolated pentest lab, having a recovery path matters just as much as building the systems in the first place.
The next step will be deciding how far I want to take the backup strategy — scheduled jobs, retention policies, or possibly additional storage options.
For now, the Data Center in a Bag has its first tested backup and recovery workflow.