For Part 3 of my travel server project, I made a pretty significant change to the original design.
The project originally centered around using Raspberry Pi-style hardware and an older Netgear Nighthawk router. That setup was useful for experimenting, but as I started thinking about what I actually wanted this travel lab to do, I realized I needed more flexibility.
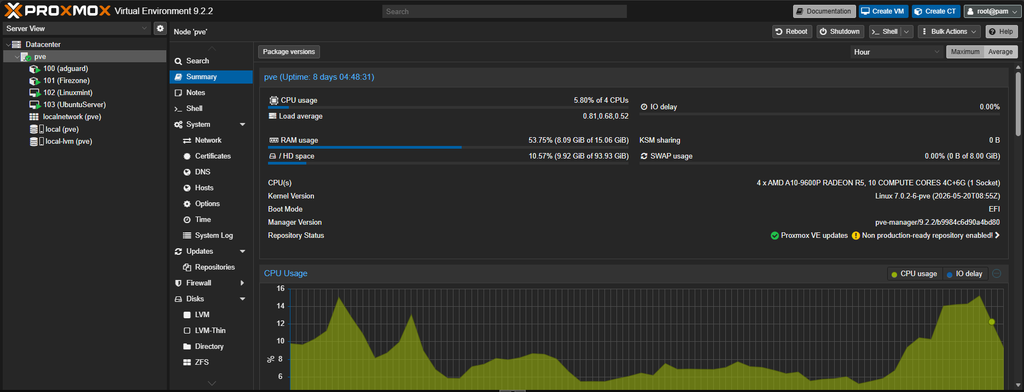
Instead of continuing to build everything around a Raspberry Pi, I repurposed a 2019 HP laptop with 16 GB of RAM and installed Proxmox VE on it.
That changed the project completely.
Rather than having one device dedicated to one or two services, I now have a portable hypervisor capable of running multiple virtual machines and containers at the same time.
Current Proxmox Build
So far, the laptop is running four primary guests:
Linux Mint XFCE VM
This is my portable Linux desktop environment.
I initially allocated 2 vCPUs and 4 GB of RAM, but after testing the desktop, Firefox, noVNC, SSH, and XRDP, I increased it to:
- 3 vCPUs
- 6 GB RAM
- 50 GB virtual disk
SSH and the Proxmox console perform well. XRDP is usable but still has some latency, which I believe is largely related to the temporary networking configuration and Firezone path. I’ll retest that once the travel router arrives.
Ubuntu Server VM
This is going to be the main application/server workload VM.
It currently has:
- 2 vCPUs
- 4 GB RAM
- Docker
- Docker Compose
- Portainer
I’ve already deployed two Minecraft Bedrock containers:
- Travel Survival
- Travel Creative
Both are configured for offline/LAN use so the travel network can continue functioning even when there is no Internet connection.
The long-term plan is for Ubuntu Server to host other lightweight Docker services as needed.
AdGuard Home LXC
AdGuard provides DNS filtering for the travel network.
It is already operational and processing DNS requests from the other systems. I’ve confirmed that it is actively blocking telemetry and advertising domains while forwarding allowed DNS traffic upstream.
Eventually, the travel router will distribute the AdGuard address automatically through DHCP.
Firezone Gateway LXC
Firezone gives me remote access to the travel network.
This has already been useful while building the environment because I can reach systems inside the Proxmox travel network even though the final travel router hasn’t arrived yet.
It also gives me a secure way to manage the environment remotely when the travel server is connected somewhere else.
The Temporary Network
Since the new router hasn’t arrived yet, Proxmox is temporarily handling more networking than I ultimately want it to.
I created a dedicated Proxmox bridge using:
10.10.10.0/24
Current layout:
10.10.10.1– Proxmox travel gateway10.10.10.2– AdGuard Home10.10.10.3– Firezone10.10.10.10– Linux Mint10.10.10.20– Ubuntu Server / Docker / Portainer
Proxmox is currently NATing that network through the laptop’s Wi-Fi interface.
It works, but I also learned firsthand why I don’t want the hypervisor acting as the permanent wireless router.
During testing, the old laptop Wi-Fi adapter started experiencing severe latency spikes. At one point I was seeing several hundred milliseconds of latency and even multi-second spikes when accessing the Proxmox interface.
After troubleshooting, I discovered the wireless adapter was periodically dropping to extremely low link rates. Disabling Wi-Fi power saving helped considerably.
That troubleshooting session alone made me even happier about the next design change.
Goodbye Netgear, Hello GL.iNet
The original idea involved using an older Netgear Nighthawk as the travel router.
It would work, but it completely defeats the purpose of building something portable.
So I ordered a GL.iNet Opal travel router instead.
The Opal will become the actual network edge for the travel lab.
Its job will be to handle:
- Hotel/public Wi-Fi
- Captive portals
- NAT
- DHCP
- Travel LAN Wi-Fi
- Internet connectivity when available
The Proxmox laptop can then connect to the Opal over Ethernet instead of relying on its own Wi-Fi adapter.
That should simplify the architecture considerably.
The final design will look more like:
Hotel / Public Wi-Fi
↓
GL.iNet Opal
↓
Ethernet
↓
Proxmox Laptop
↓
VMs + Containers
And when Internet isn’t available, the Opal can still provide a completely self-contained LAN.
That means services like Minecraft, local file storage, DNS, and internal applications can continue working without Internet access.
Why the Laptop Was the Better Choice
The Raspberry Pi idea was fun, but the old laptop gave me something much more useful for this particular project:
virtualization.
Instead of deciding whether a device should be a Minecraft server, DNS server, Linux desktop, VPN gateway, or Docker host, I can make it all of them while keeping the workloads isolated.
And for a roughly seven-year-old laptop, it has handled the workload surprisingly well.
At one point I had both Linux VMs installing hundreds of updates while AdGuard and Firezone were running at the same time.
It wasn’t exactly happy about it, but it handled it.
Current Status
At this stage:
- Proxmox is installed and stable
- Linux Mint VM is operational
- Ubuntu Server VM is operational
- Docker and Portainer are installed
- Survival Minecraft server is running
- Creative Minecraft server is running
- AdGuard Home is filtering DNS
- Firezone remote access is operational
- Temporary travel LAN is operational
The next major step is waiting for the GL.iNet Opal to arrive.
Once it gets here, Part 4 will probably focus on migrating from the temporary Proxmox Wi-Fi/NAT configuration to the actual travel network and testing everything as a self-contained portable environment.
The fun test will be disconnecting the Internet entirely and seeing how much of the “portable data center in a bag” continues working.